

Appearance
Buttons
A rule can run when someone presses its button: on a record, beside Edit, or for the rows chosen in a list. A button can ask a question first, and have a short form to fill in.
This page builds an approval: deals waiting for approval get an Approve button and a Reject button that asks for a reason. Then it gives Approve a form of its own, and explains what a form is for.
Before you start: add these fields to Deals (Fields):
- Approval, of the type Single choice, with the choices Pending, Approved and Rejected.
- Approver, of the type User: who decides.
- Rejection reason, of the type Long text.
- For the form of Approve: Approval date, of the type Date, and Project leader, of the type User.
Approve
Administration › Automation, Entity: Deals, Add a rule.
Name:
Approve a deal.When: Someone presses a button. The button's settings show under it: Button’s label at the top, then five parts that fold open. Each closed part shows a one-line summary of what it holds.
Button’s label:
Approve. The When box now reads "Someone presses “Approve”".Looks and place: Color: Prominent. Choose an icon if you like. Where it is: leave On each record ticked.
Who sees it: in Who sees it, The people in Approver. With none chosen, everyone who may see the record sees it. Leave Only for people who may change the record ticked; untick it if approvers only look at deals and do not change them, so that they may press the button all the same. On records that do not meet the conditions: Show it greyed out, with a warning, and Warning:
Only deals waiting for approval can be approved.Asks first: leave it as it is (Runs at once).
Form: leave it as it is (No form).
After it runs: Message once it ran (optional), what the person reads once it ran; Then: Stay on the record.
twig{{ title }} is approved.
Click the Only if box. For a button, its settings say The button works on records that match: add Approval is any of Pending.
Add a step: Set fields, Approval, To a value, Approved.
Add a step: Send a notification, To: The people of Owner, Message:
twig{{ actor.name }} approved {{ title }}.Save the rule.
Try it. Open a deal, set Approval to Pending and Approver to yourself, and save. Approve shows beside Edit. Press it: the rule runs at once, the message "… is approved." shows, and the deal shows its new Approval. On a deal that is not Pending, the button is greyed out, and the warning tells why.
In the rule, actor is whoever pressed the button. The deal's history names that person, and the rule.
Reject, with a reason
Add a rule (still Deals), Name:
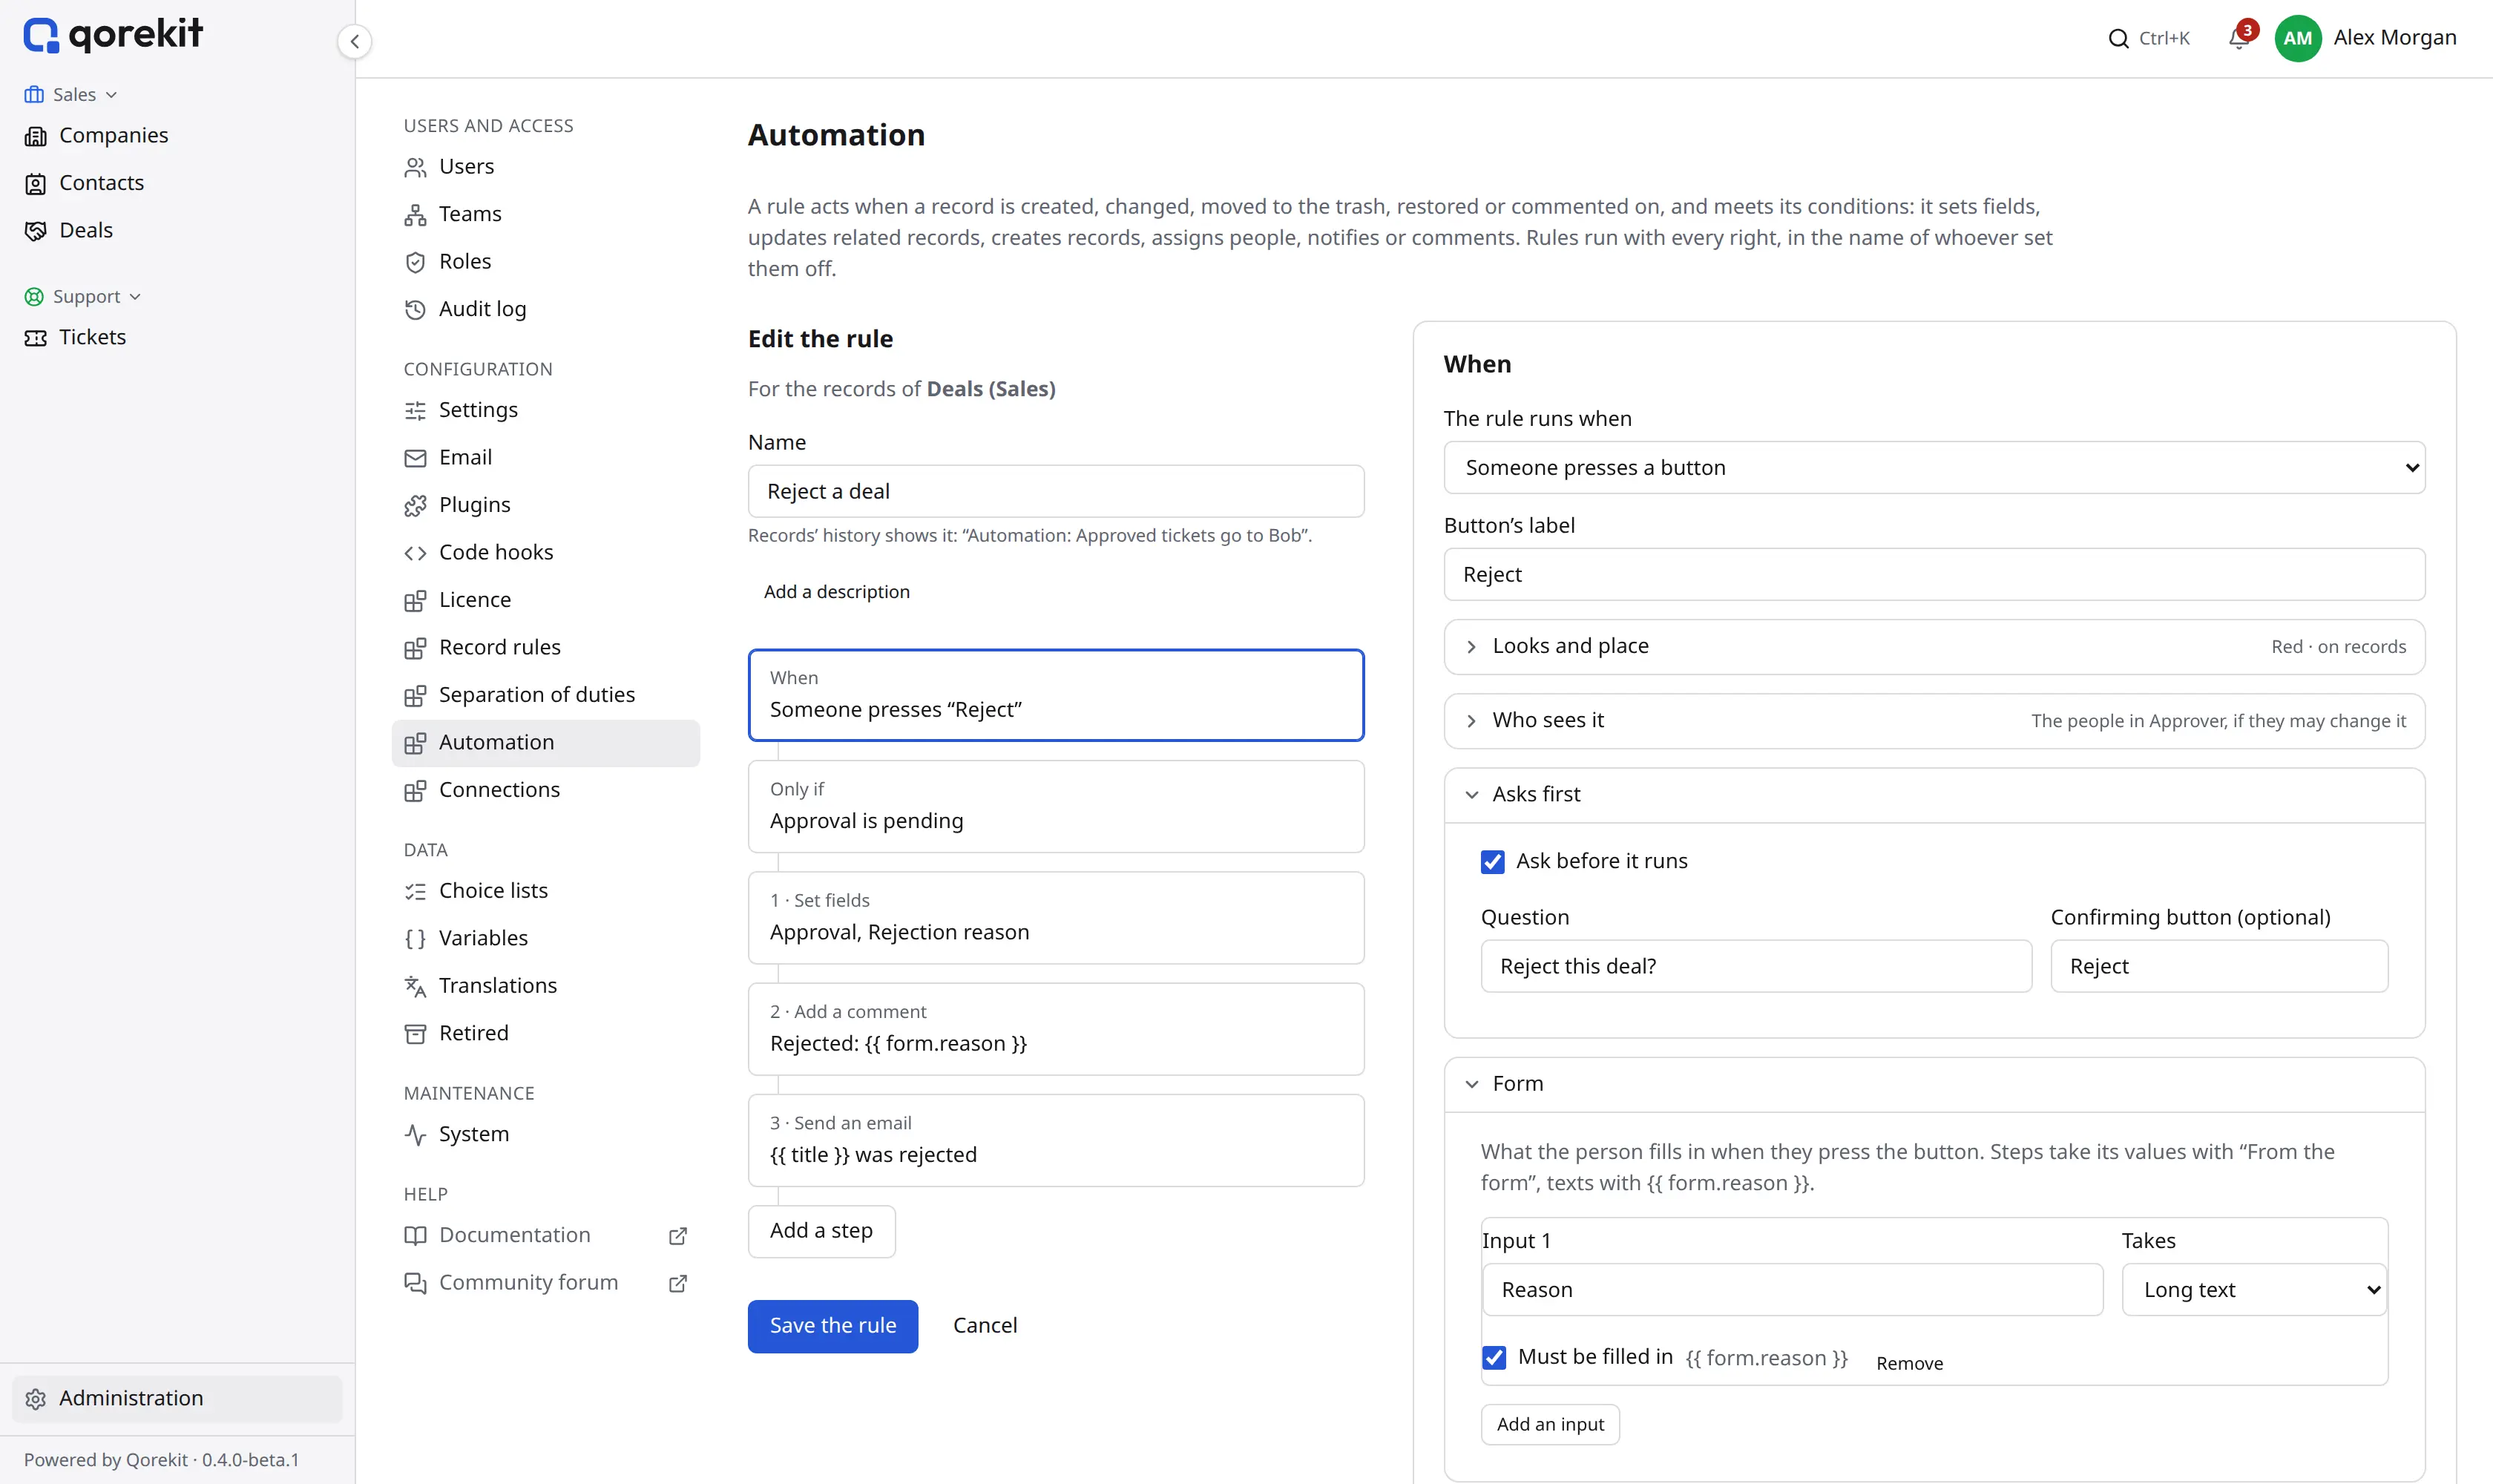
Reject a deal.When: Someone presses a button:
Button’s label:
Reject.Looks and place: Color: Red, for what cannot be undone.
Who sees it: The people in Approver. On records that do not meet the conditions: Hide the button.
Asks first: tick Ask before it runs. Question:
Reject this deal?. Confirming button (optional):Reject.Form: click Add an input. Input 1:
Reason. Takes: Long text. Tick Must be filled in. Beside it, the page shows how texts name the input:{{ form.reason }}After it runs: Message once it ran (optional):
Rejected.Then: Go back to the list.
Only if (The button works on records that match): Approvalis any of Pending.
Add a step: Set fields. Add a field: Approval, To a value, Rejected. Add a field: Rejection reason, From the form, Reason.
Add a step: Add a comment. Written by: Whoever pressed the button. Comment:
twigRejected: {{ form.reason }}Add a step: Send an email. To: The people of Owner. Text: Written here. Subject and Email:
twig{{ title }} was rejected {{ actor.name }} rejected {{ title }}. Reason: {{ form.reason }}Save the rule.
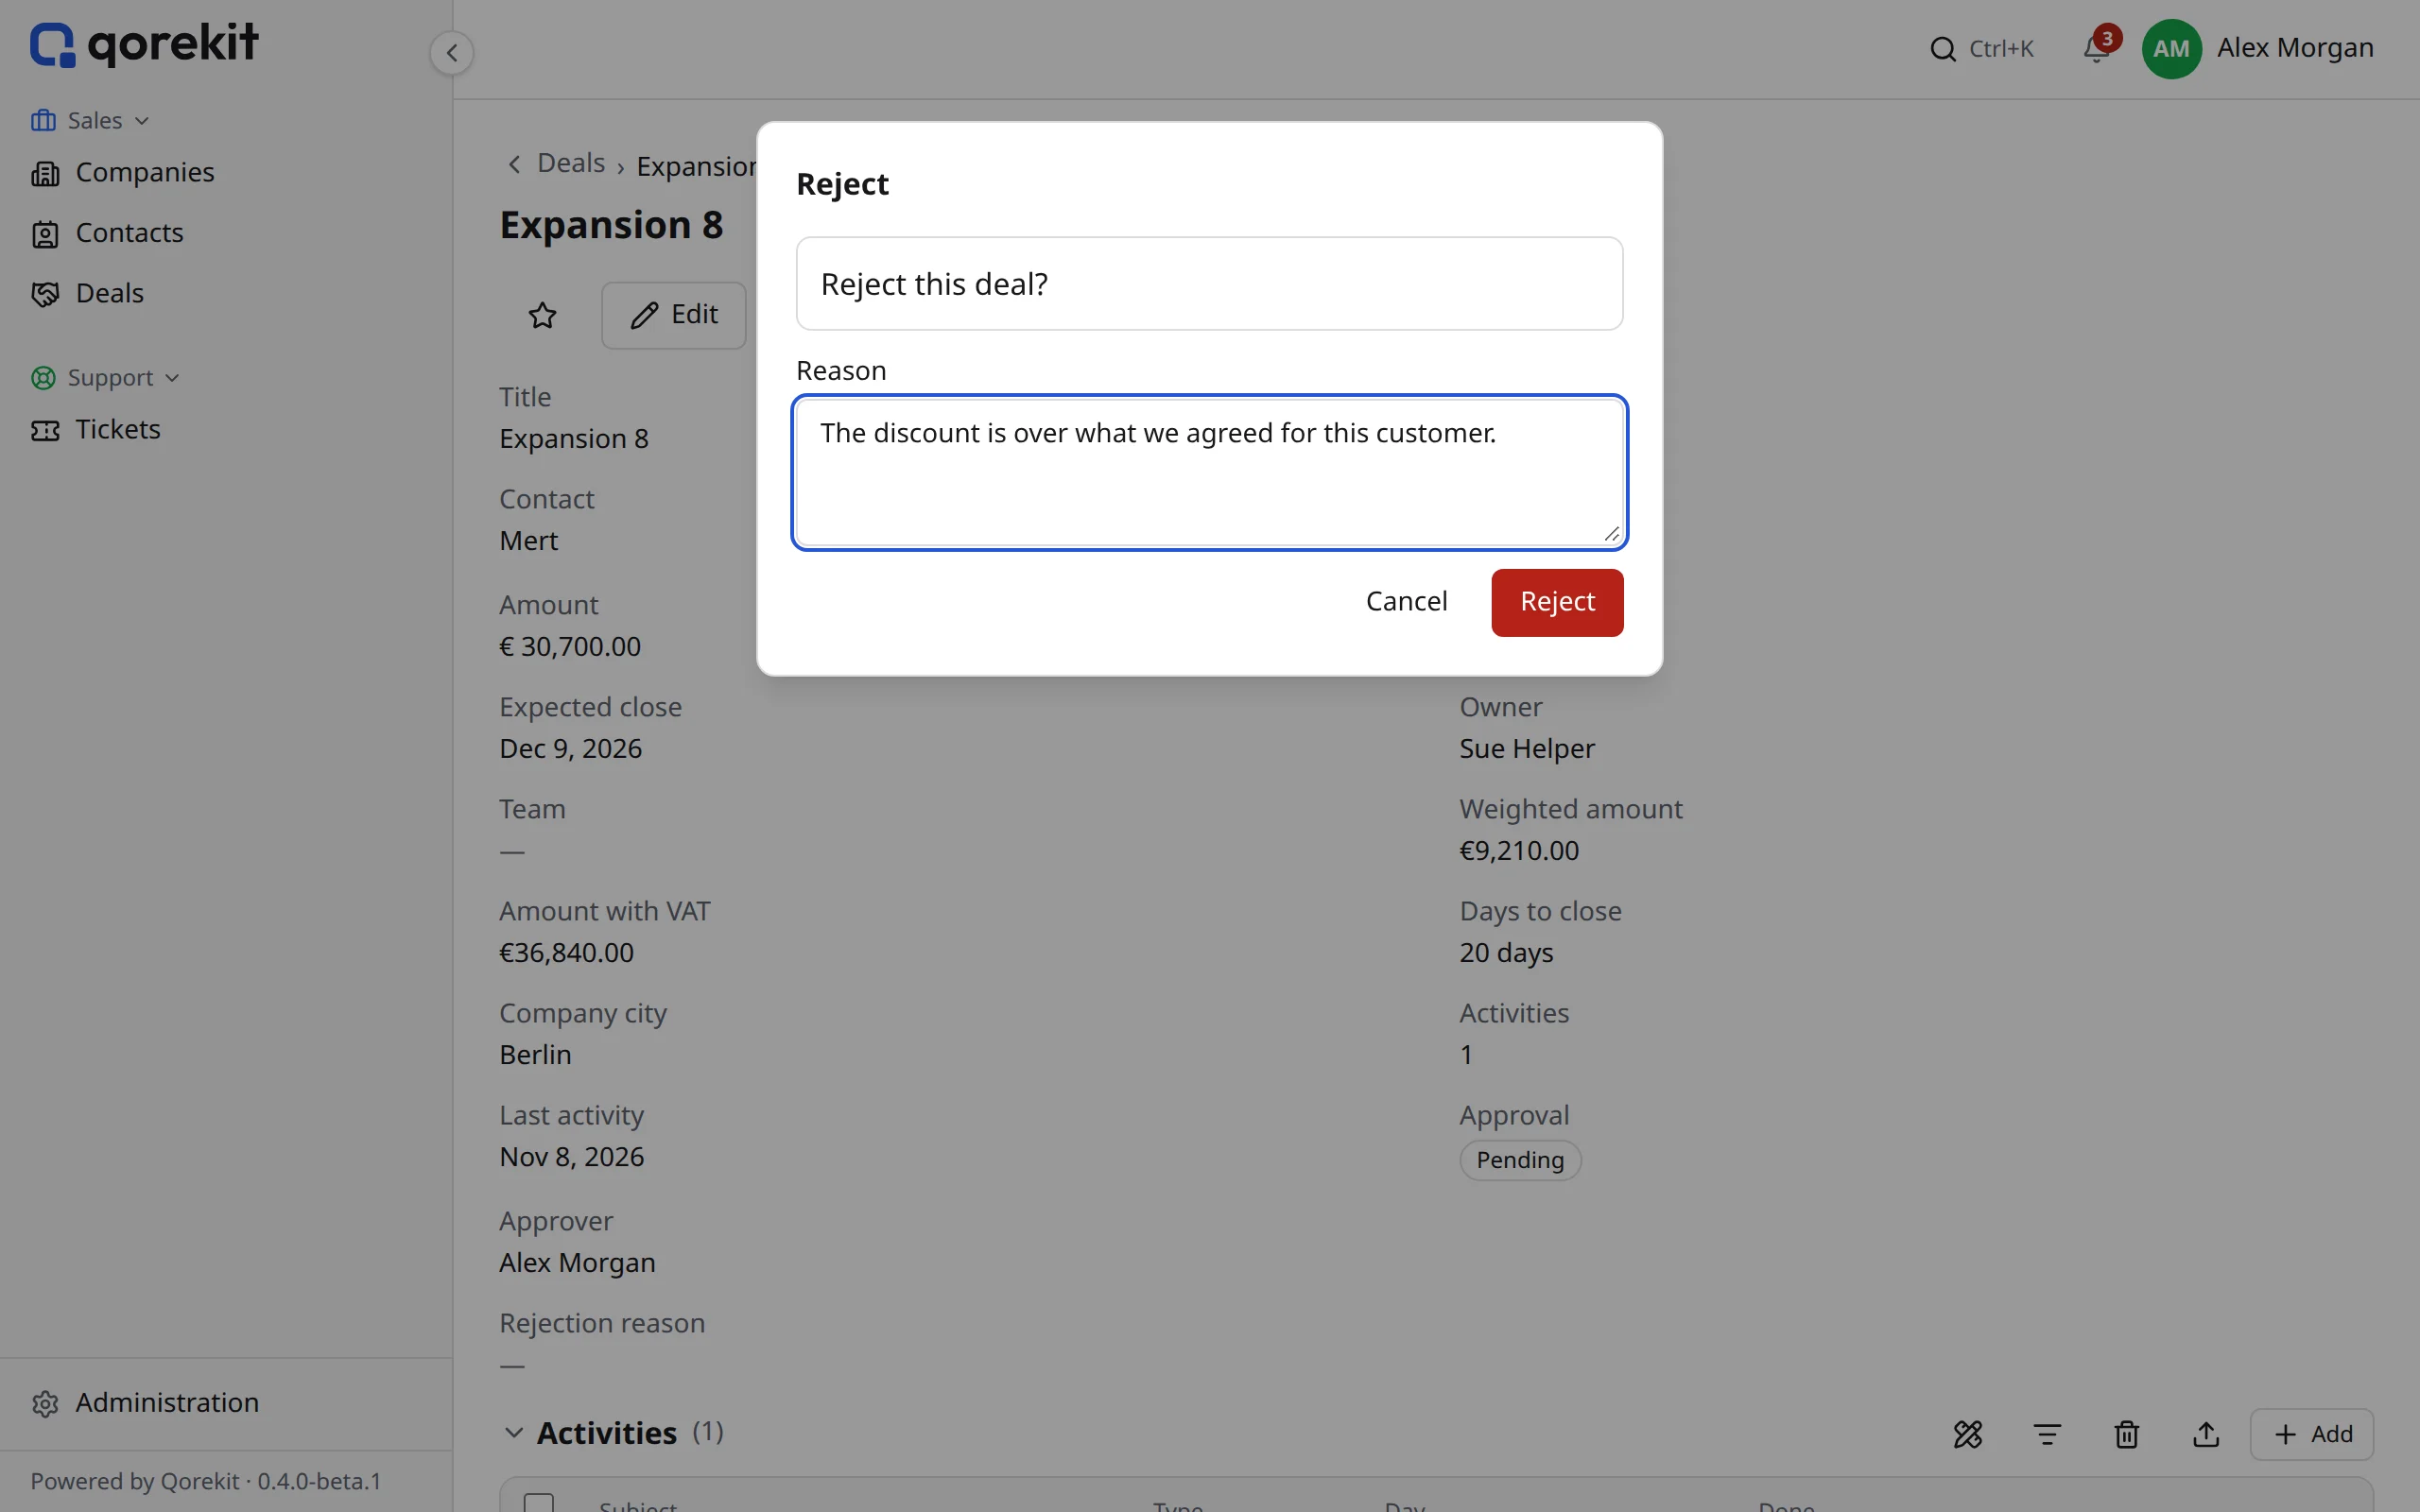
Try it. On a Pending deal, press Reject. A window asks "Reject this deal?", with a Reason box. Pressing Reject with the box empty says "Fill in “Reason”." Write a reason and press Reject: "Rejected." shows and you are back in the list. The deal's Approval is Rejected, its Rejection reason holds what you wrote, the comment "Rejected: …" shows under your name, and the deal's owner gets the email with the reason.
A button's form: what it is for
A form asks the person who presses the button for some values, at that moment: a reason, a date, a person, an amount. They fill it in, in the same window as the question, and press the button's confirming button.
The values are not saved anywhere by themselves. The steps decide what happens to them. A form whose values no step uses does nothing you can see: the rule runs, its other steps are done, and what the person typed goes nowhere. So for each input, add a step that uses it, in one of these ways.
Keep it on the record: Set fields, From the form. In a Set fields step, choose the record's field, then From the form, then the input. The Reject button above puts Reason into Rejection reason this way. Which input fits which field:
| The input takes | Into a field of the type |
|---|---|
| Short text, Long text | Short text, Long text |
| Number | Whole number, Decimal number, Money |
| Date | Date |
| Yes or no | Yes or no |
| A person | User |
| One of some choices | Short text: the text of the choice |
Name it in a text: form.key. In a comment, an email, a notification, an SMS or the button's Message once it ran, an input's value is written as in this list, for the inputs Reason, Approval date and Project leader:
{{ form.reason }}: what the person wrote.{{ form.approval_date }}: the date they chose.{{ form.project_leader.name }}: the name of the person they chose. For an input that takes A person, add.name.
With Add a comment set to Written by: Whoever pressed the button, the comment shows under the name of the person who pressed it, not the rule's.
Each input's key is made from its label as you type it, and shown beside the input, after Must be filled in: "Reason" gives reason, "Approval date" gives approval_date, "Seçim" gives secim. Small letters, digits and _; letters with accents lose them. Once the rule is saved, the key stays, even if you change the label later, so texts that name it keep working.
Required inputs. Must be filled in (for Yes or no, Must be ticked) makes the window refuse to run until the input has a value: "Fill in “Reason”."
Other steps. Find and update a record can look for a form's value: holds the value, From the form. A code hook run by Run code gets the values in $hook->input()['form'], by key.
A form has up to ten inputs: Short text, Long text, Number, Date, Yes or no, One of some choices (written in Choices, one a line) and A person.
Approve, with a date and a person
The goal. Approving a deal also records when it was approved and who leads the project. The approver gives both in the button's form, and the rule writes them into the deal.
You need the fields Approval date (Date) and Project leader (User) on Deals. Open the rule Approve a deal again (click its name in the list), then:
Click When. Open Form and click Add an input:
- Input 1:
Approval date. Takes: Date. Tick Must be filled in. Beside it, the page shows how texts name it.
- Input 1:
Add an input again:
- Input 2:
Project leader. Takes: A person. Tick Must be filled in. Beside it, the page shows how texts name it.
- Input 2:
Still in When, open After it runs. Message once it ran (optional):
twig{{ title }} is approved. {{ form.project_leader.name }} leads it.Click the step 1 · Set fields. It already sets Approval to Approved. Click Add a field: Approval date, From the form, Approval date. Add a field again: Project leader, From the form, Project leader.
Add a step: Add a comment. Written by: Whoever pressed the button. Comment:
twigApproved. Project leader: {{ form.project_leader.name }}, from {{ form.approval_date }}.Save the rule.
Try it. On a Pending deal, press Approve. The window now asks for an Approval date and a Project leader. Choose them and press Approve. The message names the leader, and the deal shows Approved, the date in Approval date, the person in Project leader, and your comment.
Without step 4, the deal would only be approved: the date and the person would go nowhere.
Both in one menu
With many buttons, a record gets crowded. In Looks and place, type the same name in In a menu named (optional) for both buttons, such as Approval: the record then shows one Approval menu holding Approve and Reject.
Who sees a button, and where it works
Two things decide whether someone sees a button on a record:
- Who sees it (in the part of the same name): roles, teams (with the teams under them), The people in … a user field of the record, or Whoever created the record. None chosen: everyone who may see the record. With Only for people who may change the record ticked, those who only look at it don't see it.
- The button works on records that match: the rule's conditions, in Only if, on the record as it is. Elsewhere, the button is hidden, or greyed out with the warning.
All of this is checked again when the button is pressed. While a press is still running on a record (a step that waits, say), the button can't be pressed there again.
A button for chosen rows
Mark solved for many tickets at once, from the list.
- Entity: Tickets, Add a rule, Name:
Mark solved. - When: Someone presses a button. Button’s label:
Mark solved. In Looks and place, Where it is: tick For the rows chosen in a list (and untick On each record if it should be only there). - Only if: Status is none of Solved.
- Add a step: Set fields, Status, To a value, Solved.
- Save the rule.
In Support › Tickets, tick some rows: Mark solved shows in the bar above the list. Press it. The rule runs for each chosen record, up to 500 at a time; the records it does not work on, or that are not for you, are left out and counted. Each record gets a run of its own in the Runs tab.